Entity Framework Core Inside Rider: UI Way

Do you work with Entity Framework Core? Would you like to manage entities right inside your IDE? Then you’re in luck! The Entity Framework Core UI plugin for Rider helps you effectively manage everything you need in EF Core. In just a few clicks you’ll have produced the necessary EF Core boilerplate code that’s necessary for database operations.
In this guest blog post, author Andrew Rublyov demonstrates the powerful features behind the Entity Framework Core UI plugin for Rider. It’s free, too! Let’s get started.

To work with Entity Framework Core, it is usually a good idea to use its powerful command-line tools – dotnet ef. They allow you to perform a full range of tasks, from creating migrations and updating the database to generating SQL scripts from the migration code and creating executable bundles from them.
However, most commands are called quite often during development, and the lack of a convenient user interface can slow down your development process as a whole.
This article touches on the new plugin, Entity Framework Core UI for JetBrains Rider, which allows you to execute most dotnet ef commands in a more user-friendly way.
Index
We’ll walk you through these topics:
- Installation
- Preparing the project
- Adding migrations
- Updating the database
- Existing database scaffolding
- Other features
- Alternatives
- Links
Installation
The easiest way to install this plugin is directly from the IDE.
To do this, go to Settings | Plugins | Marketplace and search for “Entity Framework Core”:
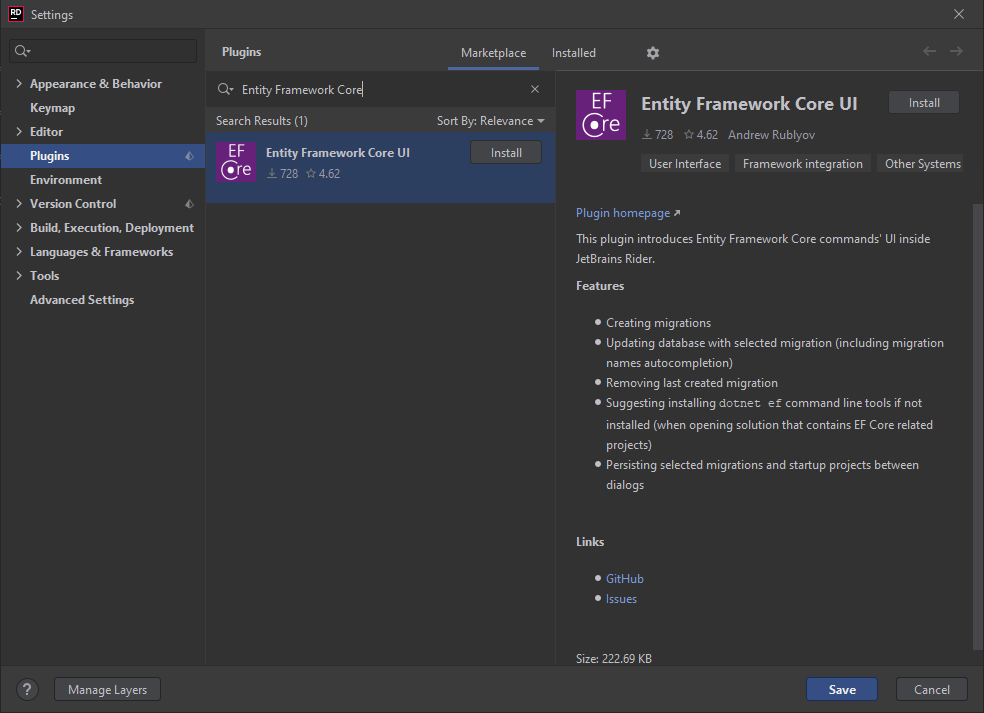
After the plugin is installed, restart Rider:

Preparing the project
For the plugin to work, a supported version of the global dotnet ef tool (3.1 or later) must be installed.
If dotnet ef has not yet been installed, you will be prompted to install it when you open an Entity Framework Core–enabled project:

When you click Fix, the necessary tools will be installed in the background.
For supported projects to appear in dialog boxes, one of the following NuGet packages must be installed in the startup project:
Microsoft.EntityFrameworkCore.ToolsMicrosoft.EntityFrameworkCore.Design
Note that projects with a target framework below netcoreapp3.1 and netstandard2.1 are not currently supported.
All dialog boxes are available in the context menu of the project in the Solution Explorer tool window, under Tools | Entity Framework Core:

Note that the dialog boxes are adjusted to the current version of dotnet ef, so not all options may be available for your environment.
Both the Migrations project and the Startup project can be used to access the dialog boxes. When executing any command through the dialog box, the current pair of projects will be saved to make it easier to execute commands on these projects in the future.
Adding migrations
When you need to create a new migration, you can use the Tools | Entity Framework Core | Add Migration dialog:

Build options contain the default values. In most cases all you’ll need to do is select the correct Migrations project, Startup project, and DbContext class.
If this is the first migration in this project, the migration name will be “Initial”.
The DbContext field only displays the available migrations in the selected Migrations project.
Skipping the build process (--no-build) is not recommended unless your project specifically needs to skip it. Although this option reduces the execution time of the command, it is also a source of potential problems.
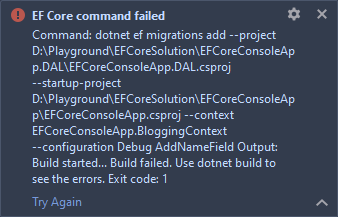
After you click OK, the corresponding dotnet ef migrations add command will be executed in the background:


If an error occurs during the execution of the command, it will be displayed in the notification and in the Event log. You can try to execute the command again by clicking the Try again button:

Updating the database
Use Tools | Entity Framework Core | Update Database to update the database to the required target migration:

The Target migration field is responsible for the target migration. Feel free to use autocompletion suggestions in this field to find the necessary migration faster. The list of migrations is sorted, which shows their order depending on the creation date.
Note: It is also possible to enter the value “0” in this field to reset the state of the database before the first migration.
If you’re updating and you want to use a different connection from the one specified in the Startup project configuration, you can select an arbitrary Connection. This can be either a connection string or a connection name from the project settings (in the format Name=ConnectionStrings:SomeName). This is important when you need to apply migrations to a specific remote environment.
Existing database scaffolding
The plugin can be used to work with database-first solutions, not only code-first ones.
To generate a DbContext and models for an existing database, go to Tools | Entity Framework Core | Scaffold DbContext:

A full range of options is available to help you customize the generation of the final DbContext. They are divided into tabs:
- Main: defines the main options, such as the connection string, the provider, the folder where the models will be generated, as well as various switches for adjusting attributes, matching table names, etc.
All of these options are consistent with those used indotnet ef.
- DbContext: options related to generating the
DbContextitself. Here you can change the name of the context, as well as the folder in which this context will be generated:

- Tables and Schemas determine which tables and schemas, respectively, will be used in the generation. To change the default behavior (generation of all tables or schemas), uncheck the Scaffold all tables or Scaffold all schemas checkboxes, respectively:
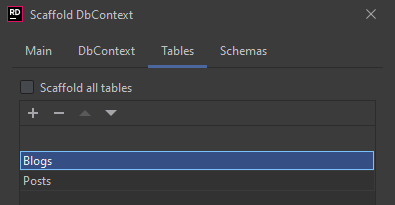
If the specified tables or schemas aren’t found in the database, they will be ignored.
As with Add migration, Output folder and Generated DbContext folder point to folders relative to the currently selected Migrations project.
After the command is executed, the generated classes will be located in the specified folders:

Other features
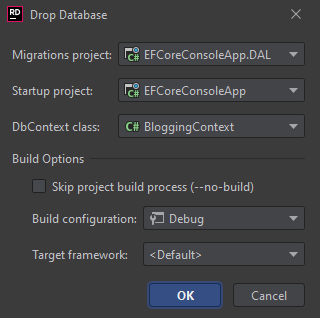
If you find yourself needing to remove the default database, select Tools | Entity Framework Core | Drop Database:
You can also remove the last created migration by using Remove Last Migration:

The Migrations project must have at least one migration to be used in this command.
Alternatives
If you need a simpler, more lightweight plugin that also works in other IDEs in addition to Rider, I suggest you check out the .NET EF Migration Facilitator by Minasie Shibeshi.
Links
Subscribe to a monthly digest curated from the .NET Tools blog: